Saturday, October 16, 2010

Click it Forward Photo Contest

Their next theme is Pumpkins!


Check out the website at http://www.clickitforward.blogspot.com/ for entry details

Wednesday, September 15, 2010

Photo Contest

Check out my photo contest at www.clickitforward.blogspot.com

Tuesday, September 14, 2010

Click it forward Photo Contest Week 1

Here is my entry!


Don't forget to check out other great entries or enter yourself at www.clickitforward.blogspot.com


Sunday, July 11, 2010

Softbox

I recently got a Westcott Apollo Speedlight kit softbox *throws hands in the air and starts doing the happy dance*.  I Love Love Love it!  It is easy to set up and I love how it changes the lighting on my photographs.  Here is my first attempt using the softbox...


I was using a smaller lumiquest softbox that attached directly to the speedlight, but that would create a harsh light.  I would also use my umbrella which is nice but when doing a portrait it would sometimes tend to flood the room with too much light.  So the new softbox is a great mix between my old softbox and my umbrella :)

Digital Backgrounds

So I have been attempting to learn how to do a digital background...why you ask?  Because I am going to do the Alice in Wonderland shoot and thought it would be really cool to learn how to do.  So I went on the net and spent way too many hours trying to learn how to do this.  I checked out youtube, and there is just way too many videos on random stuff that I found it hard to find what I was looking for.  So here is what I learned.


First of all, I can make my own plain background.  You can google this and find a ton of websites telling you how to do this.  Here is mine
So What I learned after doing this, is that I needed to add a shadow to make it look more real.  You can do this in your layers menu, click 'fx' and then drop shadow.  So here is my attempt...and not a good one I might add to the drop shadow...
I am still trying to learn the Photoshop 5 refine tool, and its not working out like I would like to so I am going to try to look up some youtube videos on that next and I will do a post on that once I figure it out :)

So I asked my sisters friend who does graphic design and she suggested deviant art for tutorials and I loved this!  Type in tutorial and what you want to learn and there is usually something you can find with step by step.  Also if you want to have a digital background made, you can get one for around $10 to $20 from Lady Aya Productions. Which is what I plan to do for my Alice in Wonderland shoot :)  So excited to see this :)  And she will place the image if I want too.

So my last suggestion is to shoot with an all black or white background or a green screen if you have one, that way you can extract the subject easier.  Make sure they are sitting about 10 feet away and put a light on your backdrop.  And if you want to put them sitting on something in your digital background i.e. a wall, sit them on a stool when you shoot. 

So I will keep practicing and searching the web on my journey to learning digital art with photography :)  Oh and if you have any suggestions...Please Please Please fill me in :)

Wednesday, May 5, 2010

Theme Ideas?

I really want to do a shoot that has an Alice and Wonderland feel to it.  I want some ideas of some props, backgrounds, etc.  Anyone?

Sunday, May 2, 2010

Test Shots


So Here is my first attempt was using the SB-900 and the umbrella (which blew over in the wind...yeah, not a wise decision. LOL)  This was off to the right of the camera.  I set it on manual and adjusted the light up and down.


This is the second one, where I used the 900 with the softbox off to the right of the subject and a direct light from the sb-28 to the lower left of the subject that was adjusted down a lot so it wouldn't put out too much light.


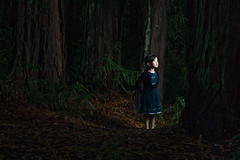
This one, I was able to get the look I was wanting (finally) *claps happily*
I put the SB900 with the softbox on manual, used a higher setting on the flash so it gave off  more light, brought it close to the subject and pushed up my aperture.  This gave it the affect that made the background look darker.

Lighting Equipment

Okay so I get the equipment, after months and I do mean months of saving.  Here is what I have:

Off-camera flash: SB-900 (which is awesome by the way) and a SB-28 (older flash unit, but works great and cheaper)


Light stands and attachments for the flash units that hold the flash and umbrella called a umbrella adapter (see right), which you can go to any camera shop and buy them and they are around 20 to 30 dollars.
Two umbrellas and one Lumiquest soft-box


Trigger:  Okay so everyone talks about Pocket Wizards, but man, they are way too much money, so I got some off brand from Japan, and they work great.  I think I spent $36 and got three receivers and one trigger off of Ebay.  Its called Yonguno Digital, CTR-301P.  Now you can use your camera to trigger your flashes with the built-in flash, but it is too difficult, especially when you are not in the line of sight of the infrared.

Lighting


redwood forest Originally uploaded by jwlphotography
I admit, I am obsessed. I spend hours on flickr a day....I know, I know, crazy! Although I think I was obsessed before, I really became obsessed when I stumbled onto a photographers blog and saw his amazing photographs and I wanted to learn how to get the same look. This was one of my favorites. Although JWL photography (You so have to check out his blog, he has to be the expert on lighting! love, love, love his work...wait did I say love his work yet?) seems to do a lot of special effects too (which I hope to learn someday, that will be my next obsession), I wanted to learn the lighting first.


Test Run:
Okay, as I try to perfect this lighting thing, I will share with you my journey. For all of you in the same boat, you have to check out Strobist, That is the place to go to learn how to do off camera flash. My problem was actually doing it, so here we go, lets look at some test run, trial and error over the next few post.

Sunday, April 18, 2010

Getting perfect skin in photoshop using Topaz Detail

Use a Duplicate layer


Open a layer mask


click back to your duplicate layer


Open Topaz Detail 2 under filers (http://www.topazlabs.com/detail/)


Click on soft looking and click ok


Click back to your layer mask and use your brush on the color black to bring back the detail in what you do not want soft like the eyes.


Then go to layers an flatten when done.


Use Clone and healing brush to take out any other unwanted details in the face and the rest of the photo.


Use the Photo filter in your layers menu as shown, adjust opacity to your liking.


Flatten the image when done.


Increase saturation of any color you may want to stand out more like the blue in the back by going to replace color under image menu


Select the color and increase saturation.


And you are done

Friday, April 16, 2010

Different Textures To Download for Free

I made these in Photoshop.

DIRECTIONS: Click on which one you want, right click, than upload to photoshop, drag to the picture you want it in, In the layers box, put the texture layer to overlay, adjust opacity to liking in the layers box, than flatten.

Thursday, April 15, 2010

How to make the eyes brighter in Photoshop

1. Make a duplicate layer under the layers tab.
2. Burn: move down to 10% under shadows and burn the dark part of the outside ring around the eye.
3. Dodge: the color part of the eye.
4. Select the eye and under filters hit "sharpen more" once
5. under image, go to adjustments, replace color, select the color of the eye that you want to enhance and increase the saturation.
6. Adjust opacity on the layer to your liking and flatten image.

PhotoShop Vintage, Actions, and Texture


I used the directions on iheartfaces.com for getting a vintage photo, then added a few more steps.


First I added a red photofilter and dropped the opacity to my liking.  I then used the eyebright action from
Coffee Shop blog  to brighten the eyes a little.  I then added a texture from
Deviant Art and put it on overlay 20%,
flattened the image...done:)

Tuesday, February 9, 2010

I Heart Faces Weekly Challenge - We heart Kisses!!

This is a pic of my sister trying to get a kiss from her son,
When I saw the posting on facebook, I knew exactly what
picture to use for the iheartfaces kisses challenge :)


go to www.iheartfaces.com to see other entries


Tuesday, January 5, 2010

I heart faces Logo Challenge

This weeks Challenge is was coming up with a logo for the www.iheartfaces.com website. Ari and I had fun coming up with ideas for taking these pictures! For only being six, she was a good sport. I tried in the first ones to not use photoshop to put in the logo so I found some letters that looked close to the logo letters and cut them out and put them on her face (They actually came in a stamp kit and it was the clear plastic that showed what the letters looked like:) The leaf and sunglasses picture was photoshopped in, but the others it was those letters (minus the "i" on two of them because I put it on backwards, I cloned out the section that was the wrong way on one and added it on the other side on the other).


“I am submitting this photo into the I Heart Faces logo photo contest. By entering, I am granting I Heart Faces LLC permission to consider my photo for use in the marketing and promotion of their website.”

Don't forget to check out the other entries at www.iheartfaces.com!